Ed F8

How to change relationship status on Facebook

How to change relationship status on Facebook: Most of the friends I made on Facebook back in 2010 were singles but currently a good number of them have gotten married and yet their relationship status is still showing single.
Does it mean that they intentionally refused to change their status? Some haters will quickly conclude that they just want to flirt! The simple truth is that most of them are just ignorant of the fact that their status is still displaying single while they are Engaged or Married. While others really want to change it but don't know where to find the Facebook settings. See: How to tag People or Pages in Photos on Facebook


How to change relationship status on Facebook


In this post, our aim is to show you how to change your relationship status on Facebook and be who you are in real life.

It makes you responsible when someone who knows your status stumble on your profile and find out that you represent your true self even on social network.

On the other hand, friends who never knew your new relationship status will be wowed when they see. So let's head on to changing your status right away!


Change Your Relationship Status on Facebook


To add or edit your relationship status:
  1. Go to your profile and click About, then Family and Relationships in the left column.
  2. Click Add your relationship status or hover over your relationship and click Edit.
  3. Choose your relationship status from the drop-down menu. Depending on your status, you may also have the option to add the name of the person you're in a relationship with and your anniversary.
  4. Use the audience selector to choose who you want to share this with.
  5. Click Save Changes.

How to add a relationship as a life event on your profile:

  • Go to your Facebook profile and click About, then Life Events.
  • Select the type of relationship or event you'd like to add. You may also have the option to add the name of the person you're in a relationship with and your anniversary.
  • Use the audience selector to choose who you want to share this event with.
  • Check the box next to Update relationship status to update your status in your profile.
  • Click Save.
See: How to Create Your Own Facebook Group

 
Note: You can only list someone in your relationship status if you're friends with that person. That person also needs to confirm that you're in a relationship together before they're listed in your relationship status.
Please share this article with friends so they can also learn how to change their relationship status on Facebook. Sharing is caring!!!
Read More
Ed F8

How To Block And Unblock Friends on Facebook 2017 Plus Video Explainer

How To Block And Unblock Friends on Facebook 2017: Are you sick and tired of some friends or you have settled your score with a friend and you want to get along. This guide is gonna help you on how to go about blocking and unblocking Facebook users.


Note: Blocking a friend will automatically unfriend the person. Unblocking on a friend does not automatically add the person to your friends list.

So, if you want to unblock a user and wants the person to appear on your friends list - you should send them a new friend request.

Attached below is a video explaining how to block and unblock a person.

Don't worry, this is the latest Facebook settings for blocking and unblocking users.

Read: Did you block friends? View your Facebook blocked


Please share this article.
Read More
Ed F8

How to delete Facebook photos fast!

Have you ever posted a picture on Facebook and later regretted putting it up there in the first place? Well, it has happened to me so many times too numerous to count. So, I embarked on what you will call a research to find out how to delete Facebook photos fast!. Guess what? I found it and I'm about to share the secret with you. Read on to find out how to delete Facebook photos fast!.

Read Also: How to remove tag on Facebook

Facebook

HOW TO DELETE FACEBOOK PHOTOS FAST!

ON YOUR FACEBOOK APPLICATION:

  1. Click on the menu button at the top right hand corner of your Facebook page
  2. Next, click on your name to view your profile
  3. Scroll down and click on Photos
  4. Click on Uploads
  5. Select the picture you want to delete
  6. Tap on the menu button at the top right hand of the screen (the menu button is like three dots piled on top of each other)
  7. On the pop-up screen click on Delete photo
  8. On the pop-up screen, you will be asked if you want to delete the photo, tap on Delete

ON YOUR BROWSER 

  1. Click on your name at the left hand side of the screen, this will take you to your profile
  2.  Click on Photos (in between friends and more, under your cover photo)
  3. Click on Your Photos
  4. Select the photo you want to delete and tap on it to open
  5. Click on Options on the menu bar below the photo, you will be asked if you want to delete the photo
  6. Select Delete this photo
  7. Click on OK to confirm
Easy as that! Delete those photos now.
Remember, you can only delete a photo you uploaded by yourself. If you want to delete a photo you were tagged in, you will have to ask the person who uploaded it to take it down.

Read Also: How to remove tag on Facebook
Read More
Ed F8

How can you hide the people and pages you follow on Facebook

How can you hide the people and pages you follow on Facebook- As we all know, by default, Facebook keeps people, pages and list you follow on its platform public and visible to every other user but you now have the choice of hiding it from other Facebook friends. Check out how to hide the people and pages you follow on Facebook.

Users now have full control on almost everything that appears on their profile for example: status, photos, albums and so on. Users also have the control of the audience of their contents for example: share with everyone, friends, friends of friends, groups and so on. Users can also manually hide a status from specific set of persons.

If you do not want public visitors to your Facebook profile to see lists, pages and people you, then you just have to hide it from them.

SeeHow to Hide Your Facebook Friend List from Friends and Others


And seeing that someone is your mutual friend, your other friends usually accept the friend request. It’s kind of embarrassing when your female friend informs you that some mutual friend of yours has sent her a friend request.

It’s good you keep people and pages you follow visible to only you and hidden from public eyes.

How to Hide People and Pages You Follow on Facebook

By default, everyone can see the Friends section of your profile. To adjust who can see your Friends section:
Go to your profile. 
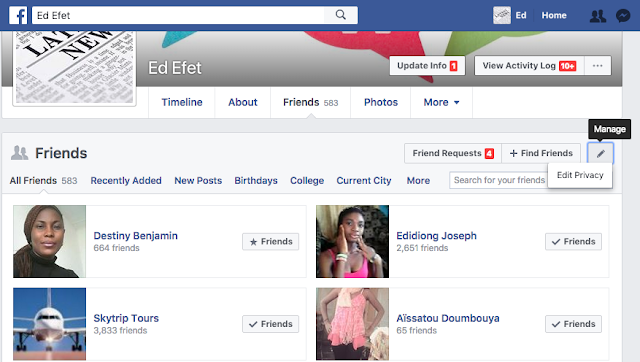
Click ''Following'' below your cover photo
Click on at the top of the page and select ''Edit Privacy'' from the drop down menu
Hide Facebook Friend List from Friends and Others
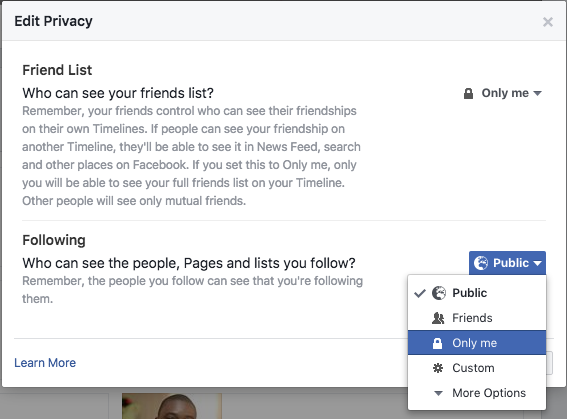
Select an audience (ex: Friends, Public) to choose who you share your friend list with on your profile.

How to Hide People, Pages and Lists You Follow on Facebook


From here you can control who can see your pages and people you follow and who can’t. I keep mine visible to only me.

Conclusion
Keeping your followed Facebook pages, list and people visible to other people is totally a thing of choice, but I prefer keeping mine hidden and private to only for my own privacy.
Read More
Ed F8

How to Hide People, Pages and Lists You Follow on Facebook

As you know, by default, Facebook keeps people, pages and list you follow on FB public and visible to every other user but you've got the choice of hiding it from other Facebook friends. Let's see how to hide pages, list and people you follow on Facebook.

See: How to hide and unhide a Facebook Post


How to Hide People, Pages and Lists You Follow on Facebook


Users now have full control on almost everything that appears on their profile for example: status, photos, albums and so on. Users also has the control of how they want to share their contents for an example: share with everyone, friends, friends of friends, groups and so on. Users can also manually hide a status from specific set of persons.

If you don’t want public visitors to your Facebook profile to see lists, pages and people you, then you just have to hide it from them.

SeeHow to Hide Your Facebook Friend List from Friends and Others


And seeing common friends, other friends usually accept the friend request. It’s kind of embarrassing when your female friend informs you that some mutual friend of yours has sent her a friend request.

It’s good you keep pages, list and people you follow private to only you and hidden from public users.

How to Hide People, Pages and Lists You Follow on Facebook

By default, everyone can see the Friends section of your profile. To adjust who can see your Friends section:
Go to your profile
Click Following below your cover photo
Click at the top of the page and select Edit Privacy from the dropdown menu


Hide Facebook Friend List from Friends and Others


Select an audience (ex: Friends, Public) to choose who you share your friend list with on your profile.


How to Hide People, Pages and Lists You Follow on Facebook


From here you can control who can see your pages and people you follow and who can’t. I keep mine visible to only me.

Conclusion

Keeping your followed Facebook pages, list and people visible to other people is totally a thing of choice, but I prefer keeping mine hidden and private to only for my own privacy.
Read More
Ed F8

How to edit and upload photos

How to edit and upload photos- Many at times, you see people add images, frames and stickers to their photo and you are wondering how they did it. Don't worry, we've got the answer for you. We'll be showing you how to edit your photos as you upload them, how upload and edit your photo and how to add a text to the photo.

HOW TO EDIT PHOTOS AS YOU UPLOAD

  • Adding a filter
  • Tagging friends
  • Cropping the photo
  • Adding text
  • Adding stickers

HOW TO UPLOAD AND EDIT PHOTO

  1. Click on ''Add Photo/Video'' at the top of your News Feed
  2. Select the photos you'd like to upload
  3. Hover over the photo you'd like to edit and click on
  4. Click to choose your edit option on the left
  5. When you're done editing, click on ''Save'' 
  6. Then click on ''Post''

HOW TO ADD A TEXT TO A PHOTO

To add a text on top of a photo, click , then click .
  • Click and drag the text box to move it
  • Click on to rotate and resize the text
  • Click on ''X'' in the top-left of the text to delete it from your photo.
Read More
Ed F8

How can you change your name on Facebook?

How can you change your name on Facebook?- Making changes to your name on Facebook is quite easy. Whether it is changing your name or adding a nickname, the process is quite easy and simple and we will show you just how easy it is.

ON YOUR FACEBOOK APPLICATION:

  1. Click on the menu button at the top right hand of the page (under the messenger logo)
  2. Scroll down to Account settings and tap on it
  3. Click on General
  4. On the pop-up screen, tap on Name
  5. On the screen that pops up, type any name you want to known as on Facebook then tap on Review change
  6. Enter your password and click on Save changes 

ON YOUR BROWSER:

  1. Click on the Facebook Drop down in the top right of Facebook and select Settings
  2. Click on Name
  3. Enter your name and click on Review Change
  4. Enter your password and click on Save Changes
 Remember that Facebook has some terms and conditions attached to changing your name on Facebook. They are stated below: 
1. Your name can't include:
  • Symbols, numbers, unusual capitalization, repeating characters or punctuation
  • Characters from multiple languages
  • Titles of any kind (example: professional, religious)
  • Words or phrases in place of a name
  • Offensive or suggestive words of any kind
2. If your name follows the standards and you're still having trouble changing it, find out why.
Other things to keep in mind:
  • The name on your profile should be the name that your friends call you in everyday life. This name should also appear on an ID or document from our ID list.
  • Nicknames can be used as a first or middle name if they're a variation of your authentic name (like Bob instead of Robert).
  • You can also list another name on your account (example: maiden name, nickname, professional name).
  • Profiles are for individual use only. You can create a Page for a business, organization or idea.
  • Pretending to be anything or anyone isn't allowed.
 
NOTE: You will not be able to change your name again until after sixty(60) days or two months.

You can also spice up your new name by adding a nickname, a birth name, etc. So go ahead, play around with some new spectacular names but make sure that your change works with the standards of Facebook.
Read More
Ed F8

How to add someone to Restricted list | Block list

How to add someone to Restricted list | Block list- Is someone disturbing you on Facebook and you don't know what to do? Blocking that person is the only solution you have. So let's show you how to add someone to restricted list |block list.
 

On Your Facebook Application:

  1. Click on the menu button at the top right-hand of the page
  2. Tap on your name to take you to your profile
  3. Scroll down and tap on "Friends"
  4. Scroll through your list of friends and identify the person you want to block
  5. Once you've identified the person, tap on his/her name to open his/her profile
  6. Next, tap on the menu button(at the far right, next to message, it looks like three dots piled on top of each other)
  7. On the options that pop-up menu, tap on "Block"
  8. On the pop-up screen, you will be asked if you are sure you want to block the person, tap on "Block" at the bottom of the pop-up screen
OR:
  1. Click on the menu button at the top right-hand of the page
  2. Scroll down and tap on "Account settings"
  3. Tap on "Blocking"
  4. On the pop-up screen, type the person's name or email
  5. Tap on "Block"
  6. A list of names will come up that matches the name that you typed, identify the particular person you want and then tap on "Block" by the far right hand side of the name
On Your Browser:
  1. Click on at the top right of any Facebook page.
  2. Click on "Privacy Shortcuts"
  3. Click on "How do I stop someone from bothering me?"
  4. Enter the name of the person you want to block and click on "Block"
  5. Select the specific person you want to block from the list that appears and click on "Block" again.
Read More
Ed F8

Block friends' app on Facebook

Block friends' app on Facebook- There are several annoying things that could happen on Facebook. Among these is getting an invite from your friend to download a game, help you with lives or help you unlock the next level. So how do you put a stop to this? Simple, just block that friends' app invitation. Check it out:

How do I Block Friends app on Facebook?


To block your Facebook friends apps you need to pay a visit to Facebook blocking center (Manage Blocking).

You can also reach the BLOCKING settings via this link: facebook.com/settings?tab=blocking

Visit the link through a web browser or simply go to Settings >> Blocking >> Manage Blocking

You will find a place to block apps - search for the app and block it.


block friends apps on Facebook

That's all!


Read More
Ed F8

Find out if you have been blocked on Fb

Maybe you've been keeping in touch with someone on Facebook and all of a sudden, you discover that you can't view his or her profile, neither can you send him or her messages.
In this article, we are going to show you how to find out if you have been blocked on Fb.
 

 STEP ONE:

The first step to finding out if someone has blocked you is trying to find his or her name on Facebook. If you can't find the profile even after trying to search by name, then there is something wrong. Next thing to do is try to search the name through mutual friends, i.e, visiting the friends list of your mutual friends on Facebook. If you still can't find the person, this could be due to three probable reasons: Your friend has blocked you, Your friend has deleted his profile, Your friend's account has been disabled either by him or Facebook following a violation of its standards. If it is the first reason, then we proceed with the following steps:

Before you proceed, check this out: Can I unblock a blocked Facebook User?


STEP TWO: 

If you have a conversation with the person then you can check through your messages. If you two sent messages (also in chat) look for them from the messages page and expand the conversation. The photo of the person will show the default Facebook image (the white outline on blue background), but what should draw your attention is the name. If the name of the person is black, in bold and you can not click on it to visit the profile, then most certainly, the person has blocked you on Facebook.

STEP THREE:

Another way to find out if you've been blocked on Facebook is to open a conversation with your friend and try to report it as spam. Re-open the message page and the conversation with the Facebook user. From the menu at the top right of the pop-up screen, tap on “Actions”, choose “Report spam or abuse”.  From the new window that opens, choose “Report one or more participants in the conversation for harassment or threats, or to have a compromised account.” then click ''OK''. If the next window reads “Operation prohibited” to the right of the name of the friend, it means you've been blocked.

STEP FOUR:

This last method is by far the simplest and easiest method. Ask a mutual friend to view the profile of the friend who you think has blocked you, if that mutual friend can access the said profile, then it most certain that you have been blocked.


CONCLUSION

If after employing these tricks, you discovered that a friend has blocked or removed you from his or her friend's list, don't worry or feel irritated. If that person has decided to block you, he or she will definitely have reasons for doing so and you should not allow it to interfere with or affect your friendship in real life. Facebook is just a social network, a virtual place to stay in touch, do not let Facebook ruin a friendship or a relationship.
Read More
Ed F8

How to remove tag on fb

How to remove tag on fb- Notifications from a friend's post can sometimes be annoying and irritating. Imagine this scenario: a friend of yours updated his/her status or changed his or her profile picture and tagged you.  The tagging is not bad but getting notifications from every Tom, Dick And Harry that comments on the post is what will likely bother you. Now, we can untag ourselves from an update on a friend's post or. Its very simple. Read on to see how to do it.

ON MOBILE:

To remove a tag from a post you've been tagged in:
1. Tap at the top right hand corner of your fb page
2. Click on your name, this action takes you to your profile
3. Scroll through your timeline to search for the post you want to untag yourself from 
4. Click on in the top right of the post and select Remove Tag.
5. Tap Ok when prompted.'

ON BROWSER

1. Log in your profile on Facebook (email address or phone number and password)
2. Click on the Facebook Drop down on the upper right hand corner of your Facebook page
3. On the drop-down menu, click on ''Activity log''
Remove Facebook tag
4. Click on ''Posts you're tagged in'' at the left-hand side of the page
Remove Facebook tag
5. This will pop up a screen that shows all the posts you've been tagged in, scroll through and select the post you want to untag yourself from by clicking on the pencil icon by the right of the post
Remove Facebook tag
6. On the drop down menu, click on Report/Remove tag
Remove Facebook tag
7. On the screen that pops up, tell Facebook the reason you want to be untagged then click on ''Continue''
8. Follow the prompt.
Read More
Ed F8

How to remove fb temporarily or permanently

How to remove fb temporarily or permanently- Removing Facebook temporarily or permanently has been made easy by the Facebook team.
Now, let us show you how to remove your Facebook account temporarily which means the same as Deactivating


On Your Facebook Application

  • Click on the menu button at the top right hand of your Facebook page.
  • On the pop up screen, scroll down to "Account settings"
  • On the pop-up screen, click on "General"
  • On the pop-up screen, tap on  "Manage Account"
  •  On the pop-up screen, tap on "Deactivate" at the right hand corner.
  • Enter your password on the screen that pops up and tap on "Continue".
  • On the next page, you will be asked if you are sure of the decision to deactivate and to give reasons why you want to deactivate.
  • After you have provided the necessary information, scroll down to the bottom of the page and tap on "Deactivate" to deactivate your account. 
  • You will once again be asked if you want to deactivate your Facebook account, tap on the "Deactivate" button to deactivate your Facebook account.

On Your Browser 

  • Log in your Facebook account details.
  • Click the account menu  at the top right of your Facebook page.
  • On the drop-down menu, select the “Settings” option.
  • The screen that pops up shows your General Account settings, click on "Manage Account"
  • On the screen that drops down under Manage Account, scroll down to "Deactivate your Account"
  • At the bottom of the page, click on the "Deactivate your account" link.
  • A new page will be open, where you need to enter your password.
  • After entering your password, click on the "Continue" button.
  • You’ll be directed to a new page, where you need to tell the reason behind your deactivation.
  • After you've provided the needed information, click on the ‘Deactivate’ button for deactivation.
  • Facebook will once again ask you to confirm your decision to deactivate Facebook account. Click on the "Deactivate Now" button to immediately deactivate your Facebook account.

If you choose to remove your Facebook account permanently or Delete your account, here's what to do:
*You are advised to download a copy of your Facebook data before you delete your account for future purposes.*

To download a copy of your Facebook data: 
  • Click the downward arrow at the top right of any Facebook page
  • Select "Settings"
  • Click on the link at the bottom of the main menu that says "Download a copy of your Facebook data".
After you have downloaded your data, all you need to do is visit this link: https://www.facebook.com/help/delete_account, click on "Delete my account", then follow the steps to confirm.
Read More
Ed F8

How to delete a photo without deleting a post

How to delete a photo without deleting a post- Do you know that it is possible to delete a photo on Facebook without deleting the post you made when uploading the photo? Yes it is very possible to delete a photo without deleting the post that accompanied it.
 
To edit a post that you have shared:
  1. Click in the top right of your post
  2. Click ''Edit Post''
  3. Make your changes and then click on ''Save''
If you've added photos as part of your post, you can also delete a photo without deleting the entire post:
  1. Click in the top right of your post
  2. Click ''Edit Post''
  3. Hover over the photos you'd like to delete and click ''x'' in the top right
  4. Click on ''Save''
Keep in mind that you won't be able to delete photos from a post you've shared from a third-party app.

Note: If your post in a group only includes one photo, you can't delete the photo without deleting your entire post.
Read More
Ed F8

How to privatize your Facebook photo album

You created a photo album on Facebook but forgot to lock it? Don't worry, we've got you covered.
Read on to learn how to privatize your Facebook photo album.

See: How to Uninstall a Facebook App on Android & iOS

Facebook

HOW TO PRIVATIZE YOUR FACEBOOK PHOTO ALBUM

On Your Facebook Application

  1. On your Facebook page, click on the menu button (the menu button is like three horizontal straight lines piled on top of each other)
  2. Next, click on your name to view your profile
  3. Next, Scroll down and tap on Photos
  4. On the top of the page under your name, swipe right to view your Albums
  5. Search for and select the album you want to privatize
  6. Tap on the album to open
  7. Tap on the menu button at the top right hand corner of the page (the menu button is like three dots piled on top of each other)
  8. Click on Edit
  9. Tap on Friends and set your preference. If the options you see at first are not okay by you, click on More for more options and tap on the option you prefer.

 On Your Browser:

  1. Log in your Facebook profile
  2. Next, click on your name at the left-hand corner of the Facebook page to go to your profile
  3. Next, click on Photos (under your cover photo and in between Friends & More)
  4. On the pop-up screen, click on Albums
  5. Select the album you want to privatize and click on the downward arrow at the bottom of the album screen
  6. On the pop-up screen, choose who should see/view the album and tap on it (You can click More to view more options)
Have fun privatizing your albums!

Read Also: How to create Facebook photo album

Read More
Ed F8

How to know if your Facebook account has been hacked

I believe that if your email can be hacked then your Facebook account can suffer the same fate. There are so many ways hackers make use of a breached Facebook account.

Your automatic logins through Facebook gives them access to many different site accounts when once they've taken over your Facebook account. Spammers also hack into Facebook accounts to gain access to your following. From your profile, a hacker can additionally gather a lot of personal information about you that can be used to steal your identity.


Recommended: How to Log out of My Facebook Account?

Facebook

How To Check And Know If Your Facebook Account Has Been Hacked

If you are afraid that your account has been hacked, there is a simple and easy way to check.
1. Click at the top-right corner 2. In the menu, select Settings. A new menu will pop up.
3. Choose Security and login, a screen will pop up to show you where you logged in and the devices you used to log in.

4. If there is a login you don't recognize, chances are you may have been hacked.
5. If you see anything that isn't you, click End Activity on the right side of the log to end the session. The hacker will be logged out, temporarily or you visit this page to secure your account. You'll be asked to change your password and review recent login activity.

Other Indications That Your Facebook Account Has Been Hacked

There are other ways to know if your account has been hacked and they are clearly outlined below:
  • Your email or password has changed
  • Your name or birthday has changed
  • Friend requests has been sent to people you don't know
  • Messages that you didn't write has been sent from your account
  • Posts that you didn't create are appearing on your timeline

What You Can Do If Your Facebook Account Has Been Hacked

There are some things you can do to protect your Facebook account if it has been hacked and they are clearly stated below:
1. Once you click on End Activity, change your password right away.
2. Next, get Facebook's help. Facebook has a system to help you if you've been hacked. Go to the Facebook help page, click on ''I think my account was hacked or someone is using it without my permission'', and then click on ''secure it''. Facebook will take you to a page where you log in and then go about the steps to securing your account.

How You Can Further Keep Your Account Safe And Secure

Facebook is filled with so many security features, all you need to do is just to activate them.
1. Go to the downward arrow in the upper right-hand corner of your Facebook page, click it and select Settings. 
2. Click on Security and login on the left-hand side of the page (under General)
3. Scroll down, under Setting up extra security, tap on Get alerts about unrecognized logins and set it to be switched on.
Facebook security
4. Tap on Use two factor authentication to log in using a code from your phone as well as password
Facebook security
5. Tap on Choose 3 to 5 friends to contact if you are logged out and set it to be switched on. These friends will help you unlock your account by sending you a code and URL from Facebook to log back in to your account if is ever hacked.
6. Go to App Passwords and have the tool generate unique passwords for your apps instead of using your Facebook password.

With these steps, your Facebook account will be much more difficult for a hacker to get into and much easier for you to recover if it is ever compromised. Remember to set your password as a random set of numbers, letters and symbols to add a final layer of security.

Note: If the email address associated with your Facebook account has changed, you can reverse this. When an email address is changed, Facebook sends a message to the previous email account with a special link. You can then click this link to reverse the email address change and secure your account.
Read More
Ed F8

Building a business/company Facebook page

Building a business/company Facebook page - Facebook, over the years has evolved into not just a social platform for us to keep in touch with friends and family, it has also provided us with the means to take our business/company to the whole world with the help of a business Facebook page. 

To be able to reach out to your customers, you have to create a unique business Facebook page. We'll be showing you steps on Building a business Facebook page.

BUILDING A BUSINESS FACEBOOK PAGE

A. CHOOSE A CLASSIFICATION:
To get started, go to https://www.facebook.com/pages/create. Here, you will have different classifications to choose from that best suits you. These classifications provide you with more significant & compatible fields for your desired page.


Building a business/company Facebook page


B. COMPLETE THE BASIC INFORMATION:
Here, Facebook will automatically guide you through the four basic sections to complete the essential aspects of your page which are:
  1. The ''About'' section: This section talks about your company. You should describe your company in two-three sentences. This description will be on your main page so try to make it concise and descriptive. Make sure the link to your company's website is included. Make sure that the information provided differentiates your brand from other brands so your page will be engaging and entrancing to potential followers. You also select your unique domain here.
  2. Upload a profile picture for the page: The profile picture will serve as the main visual icon of your page. This will appear in search results along with any posts or comment you publish. The recommended size of a page's profile picture is 180 x 180 pixels.
  3. Add to ''Favorites'': Add your business/company page as a favorite item for easy access.
  4. Reach more people: Although you will be prompted by Facebook, I would advice against running an advert at this point because your page is still at its infant stage.
C. UNDERSTANDING THE ADMIN PANEL:
Your business/company page is now live! You will be asked if you would love to ''Like'' your page. As this activity will appear in the news feeds of those who are your friends on Facebook, I would advice against clicking the ''Like'' button for the same reasons I gave under ''Reach more people''. Click on ''Settings'' in the top navigation bar. A vertical navigation bar with different sections should appear along the left hand side. We'll be treating three essential sections below:
  1. Page info: You can add more details about your business/company. The different fields shown to you here will be based on your classification in step A.
  2. Notifications: Here, you get to choose how and when you want to receive page alerts. The frequency should fit with the schedule for your social media marketing.
  3. Page roles: Here, you can invite your employees/other colleagues to make changes to the pages. Commonly seen cases are:
  • Public Relations Manager who needs to respond to any delicate question/questions
  • A Support Representative who can assist those answering technical questions
  • A Designer that will be charged with uploading new and creative images to the page 
D. FILL THE PAGE WITH MEANINGFUL CONTENT:
  1. Posts: You are currently provided with six different posting options: Plain text status, Photo with caption, Link with caption, Video with caption, Event page, and Location check-in. Make sure to post variety contents. Click on the little grey arrow in the top right corner of each post and then click on ''Pin to top'' to move that particular post to the top of your page's timeline for seven days. You can use this feature for product announcement, business/company anniversaries and other major events that are germane to your brand.
  2. Cover photo: This is the large horizontal branded image that spans the top of your Facebook page. This image will help attract people to your page. The official dimensions for a cover photo are 851 x 315 pixels.
Now that you have relevant contents on the page, you can invite users in this category to like it:
  • Colleagues/Employees: to build initial activity
  • Supporters in your network: They should be encouraged to engage
  • Customers
E. TRACK YOUR GROWTH: Metrics for tracking your page growth has been provided by Facebook. To track your page's growth, click the ''Insights'' option to see the following:
  1. Overview: This shows the page likes, post, reach, and overall engagement over a period of seven days.
  2. Likes: This shows your overall fan growth and losses. Also, if you ran an advert, you'll be able to see the detailed breakdown of paid versus organic growth.
  3. Reach: This highlights the raw number of people your page is reaching everyday.
  4. Visits: This shows you where on Facebook your viewers are coming from.
As simple as that! Go ahead and build a unique business/company page, post interesting contents and amass a loyal fan base!
    Read More
    Ed F8

    How to block someone on Facebook messenger

    We all have at least one friend who keeps sending trashy messages, pictures, GIF's and videos and you are really getting tired of seeing all those messages he/she sends. As a lady, we all have that admirer who wouldn't quit badgering you with romantic messages or requests for nude pictures, its getting on your nerves and you just want to put a stop to it because, frankly, it is grating on your nerves.

    Read How Can I Go Live on Facebook?

    The good news is, you can block that person on Facebook messenger without blocking him as a friend. Superb, right?

    This step-by-step guide will show you exactly how to do it, so stick along for the ride!

    Block someone on Facebook messenger

    HOW TO BLOCK SOMEONE ON FACEBOOK MESSENGER

    To block someone on Facebook messenger:
    1. Open your Facebook messenger application
    2. Scroll down to the person's conversation you want to block
    3. Tap the conversation and hold
    4. On the screen that pops up, tap on Block
    5. On the screen that pops up, you will get a prompt asking you to ''Block all messages'', tap on it
    6. Next, tap on any part of the screen apart from the prompt asking you to ''Unblock all messages''.

    Easy peachy! Go ahead and block that pesky and annoying Facebook friend on your Facebook messenger and get back your peace of mind.

    Remember: Blocking someone on Facebook messenger app doesn't mean you have blocked the person on Facebook entirely, the person is still your friend. To block someone entirely on Facebook, click on this link: How to Block a Facebook Friend.
    Read More
    Ed F8

    How do you go about blocking someone on Fb Messenger

    How do you go about blocking someone on Fb Messenger- We all have that one friend who keeps sending us nasty messages, pictures, GIF's and videos. As a lady, we all have that one admirer who wouldn't quit harrassing you with romantic messages or requesting for nude pictures, its grating on your nerves and you just want to put a stop to it because, frankly, it is getting on your nerves.
    The good news is, you can block that person on Facebook messenger without blocking him as a friend. Wonderful, right?..
    This step-by-step guide will show you exactly how to do it, so stick along for the ride!


    HOW TO BLOCK SOMEONE ON FACEBOOK MESSENGER

    To block someone on Facebook messenger:
    1. Open your Facebook messenger application
    2. Scroll down to the person's conversation you want to block
    3. Tap the conversation and hold
    4. On the screen that pops up, tap on Block
    5. On the screen that pops up, you will get a prompt asking you to ''Block all messages'', tap on it
    6. Next, tap on any part of the screen apart from the prompt asking you to ''Unblock all messages''.
    Easy peachy! Go ahead and block that pesky and annoying Facebook friend on your Facebook messenger and get back your peace of mind.

    Remember: Blocking someone on Facebook messenger app doesn't mean you have blocked the person on Facebook entirely, the person is still your friend. To block someone entirely on Facebook, click on this link: How to Block a Facebook Friend.
    Read More
    Ed F8

    How to turn off messenger notifications | Fb notification

    How to turn off messenger notifications | Fb notification- Imagine how mortifying it will be if you are in the presence of your boss and your phone keeps alerting you to activities on Facebook. Embarrassing isn't it? Well, we've found a solution to that. Check it out:
     

    FOR ALL CONVERSATIONS

    To turn off notifications for all your conversations:
    1. Open your Facebook messenger application
    2. Tap on this button at the top right hand of the page
    Facebook button
    3. On the screen that pops up, scroll down to Notifications & Sounds and tap on it.
    4. On the screen that pops up, tap on Notification previews
    5. Tap on it to turn off all Facebook messenger notifications and conversations
      

    FOR A SINGLE CONVERSATION

    To turn off notifications for a single conversation:
    1. Open your Facebook messenger application
    2. Scroll down to the particular message you want to turn off notifications for
    3. Tap and hold the conversation
    4. On the pop-up screen, tap on mute notifications
    5. On the pop-up screen, tap on the length of time you want the notifications of the conversation to stay on mute
    6. Tap on Ok
    As simple as that! So go ahead, concentrate on your job and that meeting or get your privacy and some ''me'' time without any interruptions or diversions from messages from Facebook friends.
    Read More